Managing Menu Items (Items List)
Overview
Q: What is the Items List page?
A: It's your main hub for managing everything related to your products. From here you can view all existing items, add new ones, edit details, or remove items you no longer need — all in one place.
Q: How do I get to the Items List?
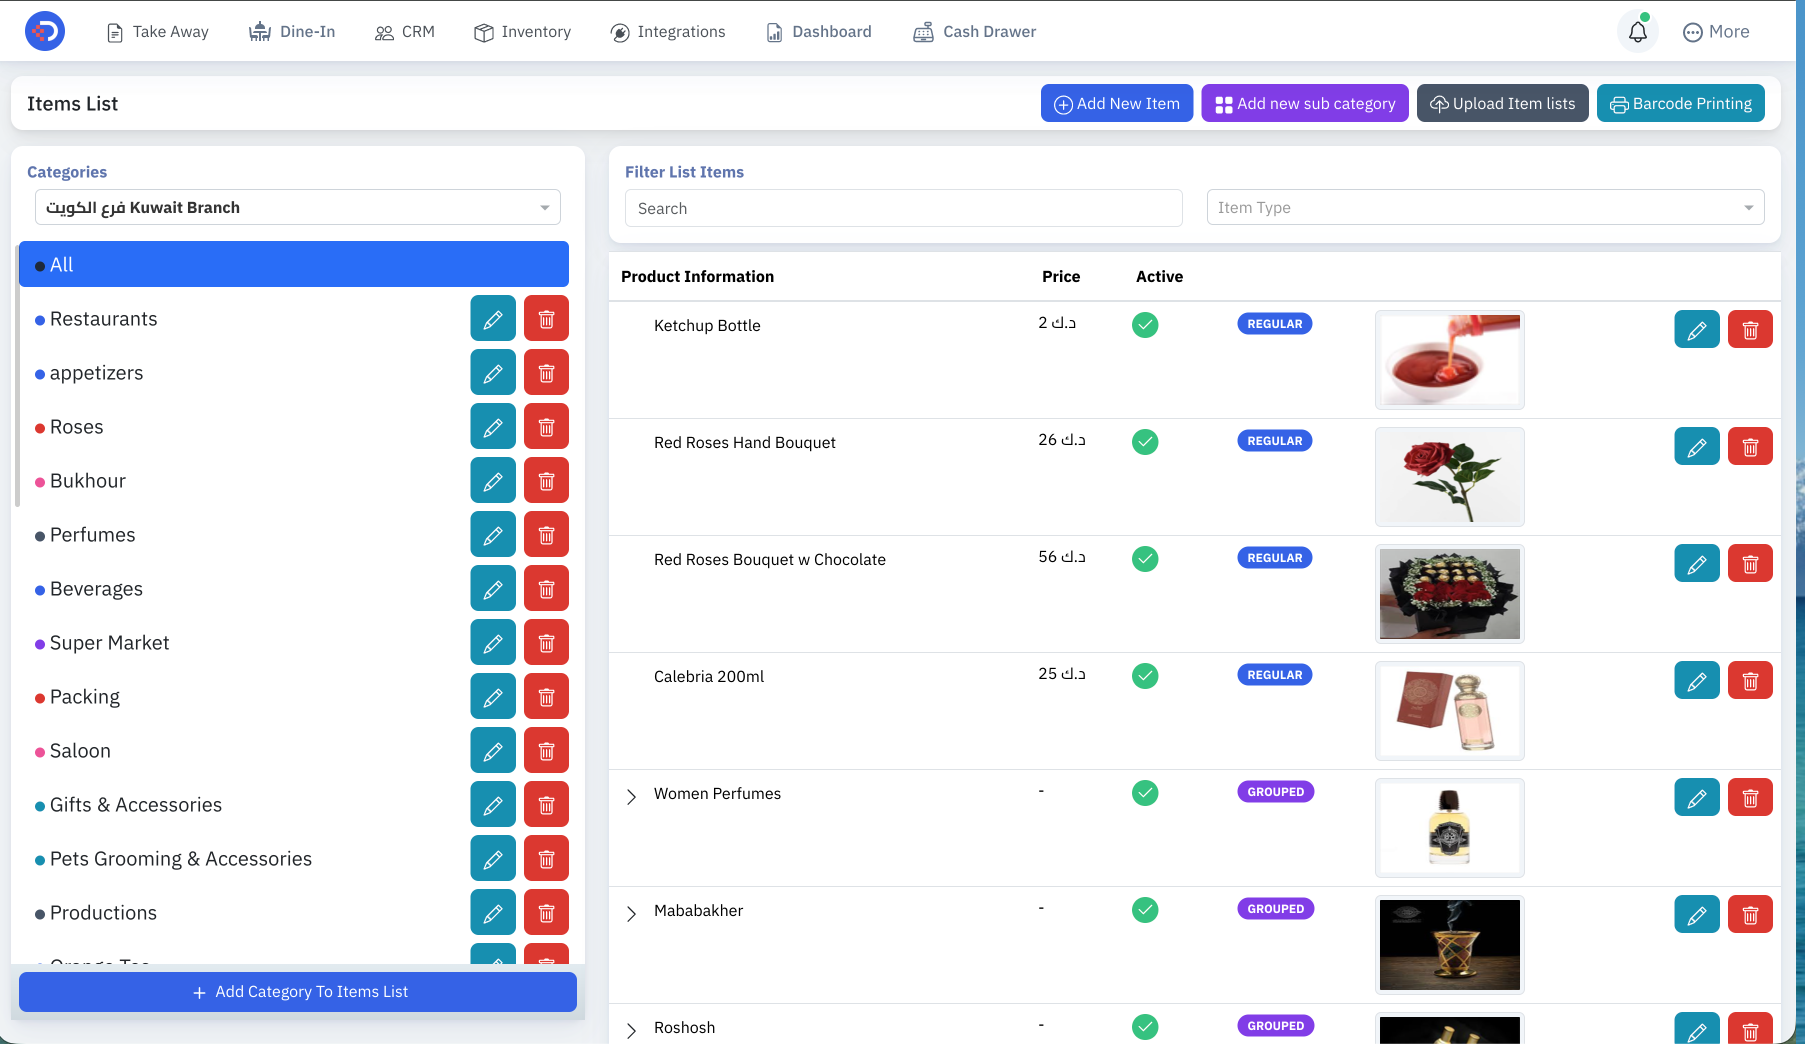
A: From the top navigation bar, click on More, then Items List. The page is split into two sides — the left panel shows your categories, and the right panel shows all your menu items.
Q: What's the difference between a Regular item and a Grouped item?
A: A Regular item is a single product with its own price, like "Ketchup Bottle" or "Red Roses Hand Bouquet." It appears with a blue REGULAR badge. A Grouped item is a container that holds multiple related items under one name — for example, "Women Perfumes" which contains several individual perfume products inside it. Grouped items appear with a purple GROUPED badge and an arrow you can click to expand and see what's inside.
Adding a New Item
Q: How do I add a new item to the menu?
A: Click the green "Add New Item" button at the top right of the Items List page. You'll be taken to a form where you fill in the following:
- English Name — the product name in English
- Arabic Name — the product name in Arabic
- Items Category — select the category this item belongs to
- Item Status — leave it toggled ON if you want the item visible right away
- Image — upload a product photo (800×800 pixels recommended, max 6MB)
- Default Price — enter the item's price
Once you're done, click Save and the item will be added to your list immediately.
Q: Why do I need to select a category before I can see the branches?
A: The system links branches to categories, so it needs to know which category the item belongs to before it can load the relevant branches. As soon as you select a category, the branch availability panel on the right side of the form will load automatically. You'll see the message "Select a category first to load your branches" as a reminder until a category is chosen.
Q: What should I put in the Item Code field?
A: The Item Code is an internal SKU you use to identify the product in your own system. It's optional — you can leave it blank if you don't need it. But if you manage a structured inventory, filling it in will help you track products more easily.
Q: Can I add a description for the item?
A: Yes. There's a Description field where you can write a short description of the product. This description will appear on the digital menu that customers see, so keep it clear and useful — things like key ingredients, flavor notes, or what makes the item special.
Q: What are Modifiers and when should I use them?
A: Modifiers are the extra choices that appear to the customer when they order an item — things like "Extra Size," "No Sugar," or "Add Nuts." There are two types:
- Optional — the customer can choose or skip
- Mandatory — the customer must make a selection before completing the order
To add them, scroll to the bottom of the Add/Edit Item page and click "Modifier Mandatory / Optional."
Q: What image size should I use for product photos?
A: The recommended size is 800×800 pixels in PNG or JPG format, with a maximum file size of 6MB. Using this size ensures the photo looks sharp and professional on the digital menu.
Branch Pricing
Q: Can I set a different price for each branch?
A: Yes, and this is one of the most powerful features in the system. When you open an existing item to edit it, you'll see a branch table on the right side showing every branch with its own price field. Just type the price you want for each branch directly in the table.
Q: How do I apply the same price to all branches at once?
A: Check the "Use this price for all branches" checkbox at the top right of the pricing section. The default price you entered will be applied to every branch automatically — no need to update them one by one.
Q: What does "No Price Change" mean in the Sales Price Change column?
A: It means the cashier at that branch cannot manually change the price of this item during a sale. If you set it to "Full Price Change," the cashier will be allowed to modify the price when needed.
Editing and Deleting Items
Q: How do I edit an existing item?
A: In the Items List, find the item you want to update and click the teal pencil icon on its row. You'll be taken to the Update Item page where you can change any field — name, price, image, category, branch availability — then click Save when done.
Q: How do I delete an item?
A: Click the red trash icon next to the item in the list. The system will ask you to confirm before deleting. Keep in mind that deletion is permanent and cannot be undone.
Q: What happens when I turn off the Item Status toggle?
A: The item will be hidden from the digital menu and from the POS screen, but it stays saved in the system. You can turn it back on anytime. This is useful when a product is temporarily out of stock — instead of deleting it, just deactivate it.
Grouped Items
Q: When should I use a Grouped item?
A: Use it when you have a collection of related products you want to display under a single name. For example, "Women Perfumes" as a group containing multiple individual perfumes, or "Bukhour" containing different incense types. It keeps your menu organized and easy to browse.
Q: How do I create a Grouped item?
A: Click the purple "Add new sub category" button at the top of the Items List page. Fill in the English and Arabic names, select a category, upload an image, then hit Save. After saving, you can go back and assign individual items to this group.
Q: Does a Grouped item have its own price?
A: No. A Grouped item is just a container — the price lives on each individual item inside the group, not on the group itself.
Searching and Filtering
Q: How do I quickly find a specific item?
A: Use the Search bar at the top of the items panel. Start typing the item name and the list will filter in real time — no need to press Enter or any button.
Q: How do I filter items by category?
A: Click any category name in the left sidebar and the items list will instantly show only the products in that category. Click All to go back to viewing everything.
Q: How do I quickly view only disabled items?
A: Use the Item Type dropdown filter next to the Search bar. It has four options — All, Regular, Grouped, and Disabled. Select Disabled to instantly see all deactivated items in one place. This is especially useful when you want to review and re-enable items that were temporarily turned off.
Q: Can I search and filter by category at the same time?
A: Yes. Select a category from the sidebar first, then type in the search bar. The search will run only within that selected category, giving you much more precise results.
Barcode and Bulk Import
Q: How do I add a barcode to an item?
A: In the Add or Edit Item page, scroll down to the Barcode section. Select the Barcode Type from the dropdown, then enter the barcode number in the Barcode field. On existing items, you'll also see a Print button to print the barcode label directly.
Q: Can I add many items at once instead of one by one?
A: Yes. Click the "Upload Item lists" button at the top of the Items List page. This lets you import items from a file (typically Excel or CSV), which saves a lot of time when you're adding a large number of products.
Frequently Asked Questions
Q: Why aren't my branches showing up when I add a new item?
A: You need to select a category first. The system loads branches based on the selected category, so pick a category from the dropdown and the branches will appear automatically.
Q: Can I delete an item that is linked to past orders or inventory?
A: No. The system will not allow you to delete an item if it is associated with existing orders or if it is linked to your inventory setup. This is a safety measure to protect your sales history and stock records. If you no longer need the item, you can deactivate it by turning off the Item Status toggle instead — this hides it from the menu and POS without affecting any related data.
Q: Can the same item belong to more than one category?
A: No, each item belongs to one category only. If you need to change its category, open the item for editing and select a different category from the dropdown.
Q: I turned off an item but it still shows on the POS — why?
A: Try refreshing the POS screen. Status changes are saved immediately in the system but the POS may need a refresh to reflect the latest updates.
How to Import Modifiers from Another Menu Item
Instead of rebuilding modifier groups from scratch, you can copy them directly from any existing menu item that already has modifiers configured.
Steps
-
Open the menu item form
Navigate to Menu Setup → Menu, then open the item you want to add modifiers to by clicking its name or the edit button. -
Go to the Modifiers tab
Inside the item form, click the Modifiers tab. -
Click "Import Modifier"
Click the Import Modifier button to open the import dialog. -
Search for a source item (Step 1)
Use the search box to find the menu item(s) whose modifiers you want to copy. Each result shows the item name and a badge with the number of modifier groups it has.
Check the box next to one or more items, then click Next. -
Select modifier groups and options (Step 2)
The dialog now shows every modifier group from the items you selected. Each card displays:- The group name and whether it is optional or mandatory (min > 0)
- The minimum and maximum number of selections allowed
- Whether multiple quantities are supported
- A table of modifier options with their additional prices
Check or uncheck individual options, or use the group-level checkbox at the top of each card to select/deselect the entire group at once.
-
Click "Add Selected"
Click Add Selected to import the chosen modifier groups into the current item. The imported groups appear immediately in the Modifiers tab. -
Save the item
Click Save on the item form to persist the changes.
You can import from multiple items at once — select several source items in Step 1 and all their modifier groups will appear together in Step 2, labeled with their source item name.
Importing copies the modifier groups and their options at that point in time. Future changes to the source item's modifiers will not automatically update the imported groups.